Email Builder
The Email Builder in Gym Lead Machine is a drag-and-drop email builder that you can use to send newsletter-style emails to leads or clients. You can make a standard template (or more than one) in the Email templates and then use that template time and again with minor updates.
The Kilo team has created a gym newsletter template that can be added to your account anytime! If you'd like the Kilo newsletter template added to your account, please email hello@usekilo.com to request it from the team.
Use the steps below to prepare and send emails through GLM's Email builder.
Creating email templates
-
To create an email template using the Email Builder, click on the Marketing tab in your GLM menu, and then hover over Emails in the upper menu. Then, select Templates.
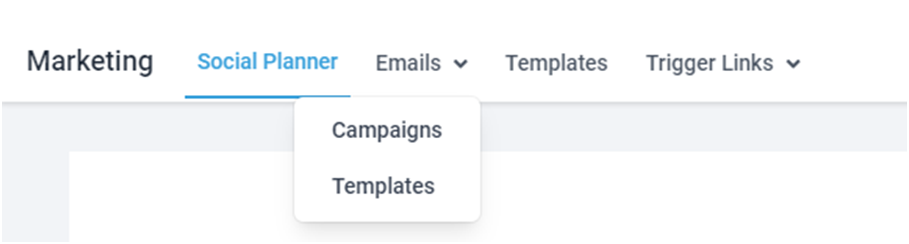
- A list of any existing Email Templates can be found here.
-
To edit an existing template, click the pencil icon on the right or click directly on the template label.

-
To create a new template, click the + New button in the upper right, and choose from the drop-down list that appears.

Selecting "Blank template" will allow you to design a new template from scratch. Be sure to select "Design Editor" rather than "Code Editor" for better ease-of-use. 
Selecting "Email Marketing Templates" will allow you to choose from a small gallery of pre-made templates. - Begin by naming your new template.
- If you opted to start from Blank, delete the first block so you can truly start from scratch.
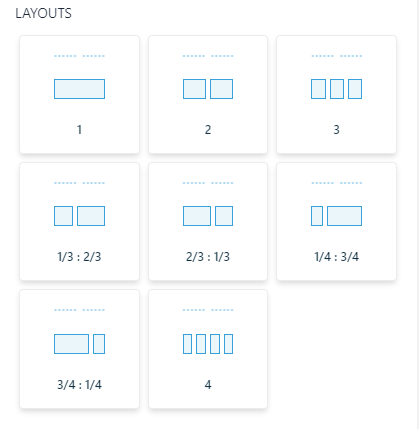
- Grab a Layout block from the left-hand side menu. Choose how many columns you would like to start with.
-
Option 1 is a full-width layout block and is appropriate if you want to insert your logo at the top of your template.
-
-
Toggle on or off the Padding toggle in order to manage the spacing around the block. Padding is the spacing around the section. Adjusting the numbers will add additional space to the top, bottom, and sides.
- Background type pertains to content width or full background, you can also add background pattern(s). To add a color to a background section, hover over the section and select it. Scroll down on the left-hand side to add background color, pick a color, and adjust the text color as needed.
- Click ‘Done’ when you have adjusted any of the settings and remember to Save your template as you work.
- Drag in additional Elements to build your email template.
-
To add an Image element, select “Replace," upload an image into the File Library or choose one that has been previously uploaded. Once you have selected your image, click the link button to copy the image URL, return to the previous screen, and add to the image URL.
You can add alternative text, link your image (optional), select the width/height of your image, adjust, or add padding around the image and use ‘Align’ to determine the position of your image. Click ‘Done’ when your image is complete.
- For a text box element, you can add a heading or paragraph text.
- If you want to add a button, drag the Element in and customize the button settings on the left-hand side.
- To add a Divider, drag in the Element and adjust as needed. Then, click ‘Done.'
- Add additional sections with optional elements (i.e. social media links and the appropriate URL).
- Add a footer element that will automatically bring in information based on your account (i.e. location name, email, etc.)
-
-
To update the unsubscribe link in the footer, click on the footer element so the editor appears on the left. Highlight the unsubscribe copy and click the hyperlink button. Select the proper unsubscribe link from the link list and Save.

-
If you make a mistake, click either the undo or redo buttons at the top to go back and forth between changes.

- To save changes, click the “Save” button in the upper right.


Appearance tab options
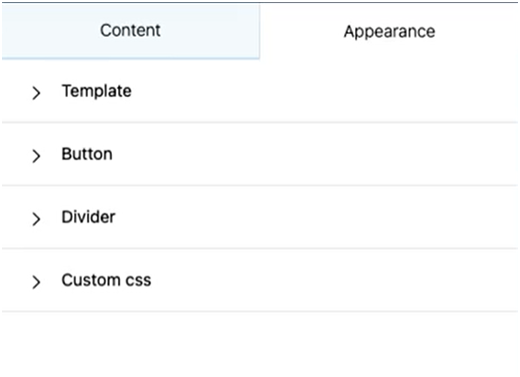
The options on the Appearance tab are global settings for the email template on which you're working. By clicking into the template, you can set the background color, body color, and even the width of the background image, font size and style, divider height and style as standard - global - settings.
If you will be using multiple buttons that will function the same, you can use a universal button tab to set the button appearance. After adjusting and saving this change, the button element will take on all the same settings when you pull in the button element to the template.
General template reminders

- Remember to save the email regularly - it never hurts to save as you enter new elements or information.
- To preview the email, click the three dots next to "Save Template" and select Preview. You can preview the email on desktop, tablet, and mobile.
- Within the three dots menu, you can also send yourself a test email.
- If you prefer to use an earlier version of your template, use the "See Version History" option to view and revert to earlier forms of the email.
Sending a template as a campaign
Once your email template is prepared, you can use it time and again to send it as a campaign.
-
Hovering back over Email in the Marketing tab of your account, click on Campaigns.
Select "Create Campaign" in the upper right.

Select the template you'd like to use for this Campaign by clicking the check mark that appears when you hover over the template.

Make any necessary changes to the template for this particular send, including the name for this particular campaign. Click Save to save the changes.
Click Send or Schedule in the upper right.
On the left, select how to send or schedule your email campaign.

- Select "Send Now" to send immediately.
- "Schedule" to have the email sent at a particular date and time.
- You may also opt to "Batch Schedule" the campaign which means you will send it only to a certain number of contacts over a pre-determined set of time. This is helpful if you are sending to a very large group and want to avoid spam filters with a large, mass send.
- Start on is when the first batch will send.
- Batch quantity is how many will be sent each time.
- With the drop-down that says "hours" at default and the Repeat After field, pick the frequency.
- So you may opt for a batch quantity of 50 that repeats after 1 minute. So 50 emails will be sent per minute until the list is exhausted.
-
RSS Schedule is for scheduling emails that are based on your blog posts. You can learn more about them here.
On the right, complete the email send information and choose your audience.

- From Email - this is the email address that will appear as the sender in the recipient's inbox.
- From Name - this can override the email in the inbox list view. Often, this is your business name. (i.e. the email will appear from "Kilo" in the list view, rather than "hello@usekilo.com")
- In the Email Subject drop-down, set the subject line for the email and any preview text you'd like to appear in the recipient's inbox list view.
- In the Recipient (To) drop-down, you are selecting who will receive this campaign.
- You can select "All contacts" to send to everyone on your GLM contact list.
- You can select a particular Smart List that has been prepared in your GLM Contact section.
- You can opt to send this email to only those contacts with a particular tag (i.e. "client").
- When you are scheduling an email and opt for Smart List or Tag, you'll see an Advanced Condition appear. This is allowing you to include new contacts that are not on the list yet but will be there by the time the scheduled send arrives. This is a great feature for including your newest clients in your newsletters.
- Click Schedule or Send in the lower right and you've done it! 🎉
- Your scheduled and sent emails, along with drafts, will be listed in the Campaigns view of the email builder. You can also return to this list to view Email Statistics later on.


If you have further questions regarding the Email Builder in Marketing, please contact the support team at hello@usekilo.com.