


Offers are how people get access to your Membership courses in Gym Lead Machine, whether those courses are free or paid. You create an Offer for one or more Products, and clients opt in (and pay, if there is a price) to receive access. Once they opt in, clients can view their Product library, and first-time users receive a Welcome Email containing a username, a password, and a link back to their course.
What you can do with Offers
Grant access to one or more Products through a single opt-in
Create free Offers with no payment portal connected
Charge a one-time payment or set up a recurring subscription
Change an Offer's price and products after it is created
Customize the checkout page with your own banner, logo, video, and copy
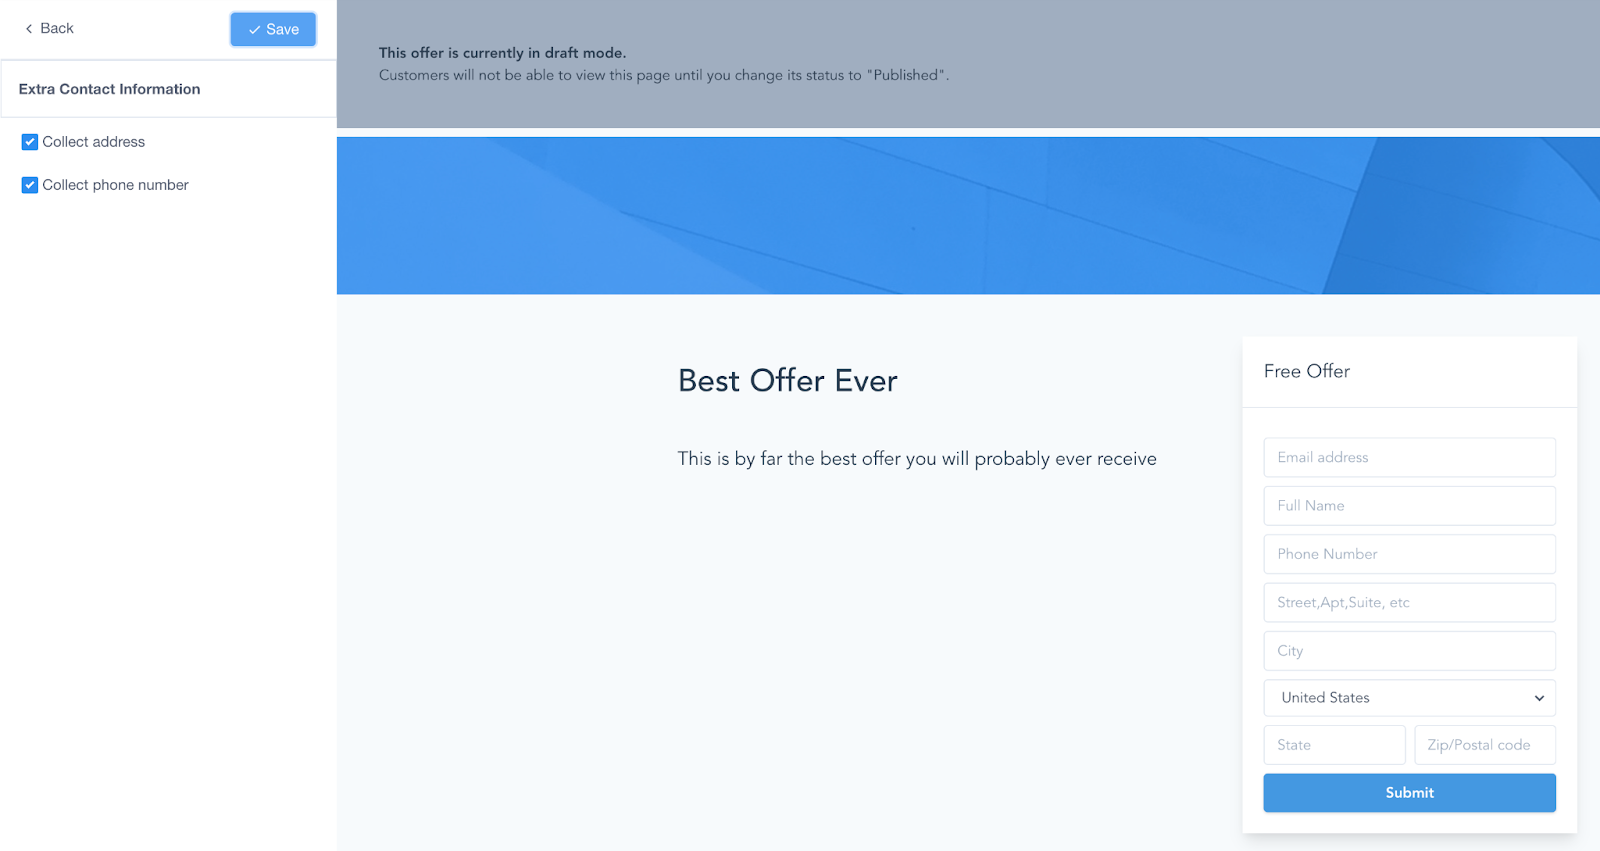
Collect an address or phone number alongside the standard contact fields
Require a service agreement before checkout completes
Create an Offer
You only need a payment portal such as Stripe if you plan to collect payments. Free Offers can be created without connecting one.
Go to Memberships in the left menu.
Hover over Courses and select Offers.
Click Create Offer in the upper right.
Name the Offer.
Select the main Product you want to include. You can add more Products later.
Set the price. It can stay at 0 for now and be changed later.
Set the mode to Live.
Click Create.
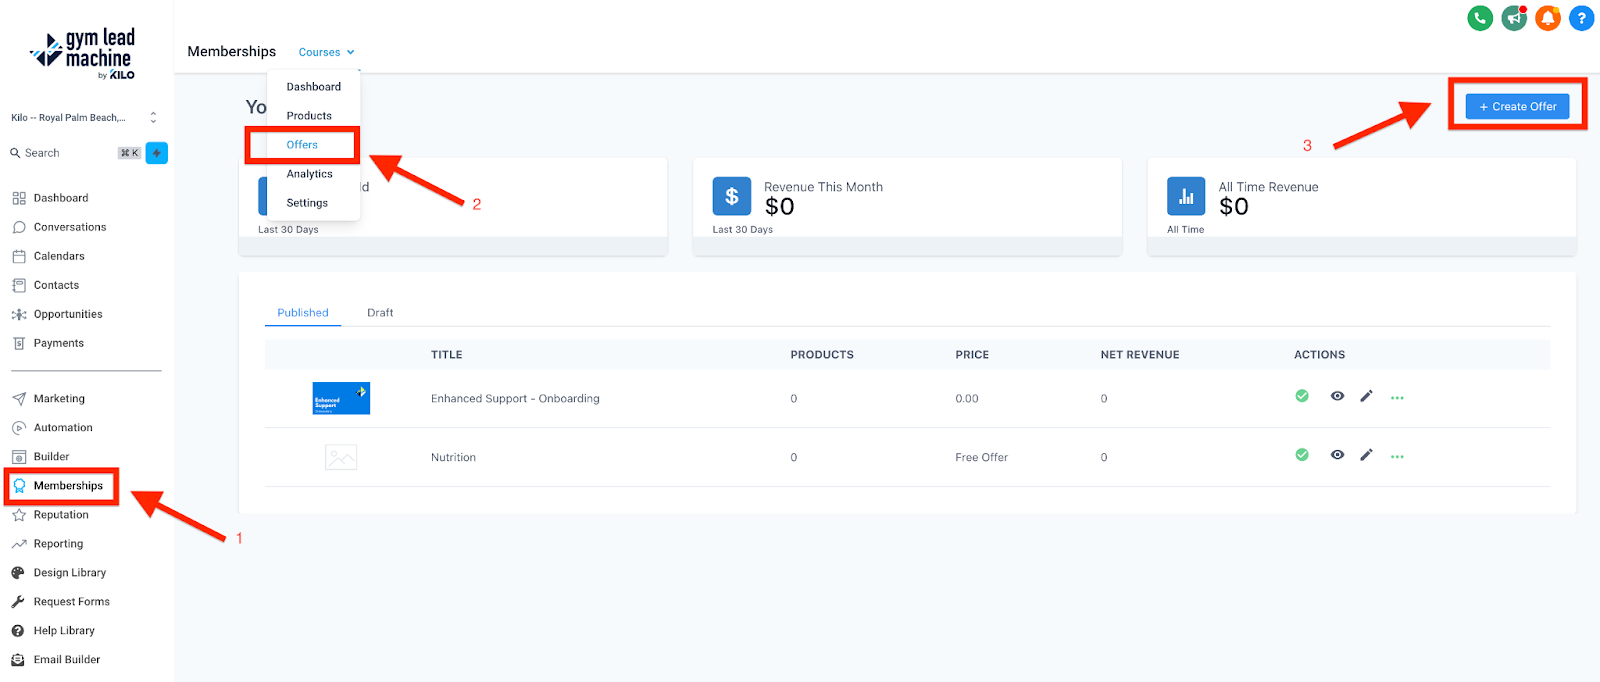

Creating the Offer takes you straight to its detail page.
Add details and set the price
On the Offer detail page you can add an Offer description, add more Products to the Offer, and adjust the price and payment type.

To change how the Offer is paid for:
Click Edit Price.
Choose a free Offer, a one-time payment, or a recurring subscription.
Set the Offer to Published.
Click Save.
Click Edit Checkout to move on to the checkout page.
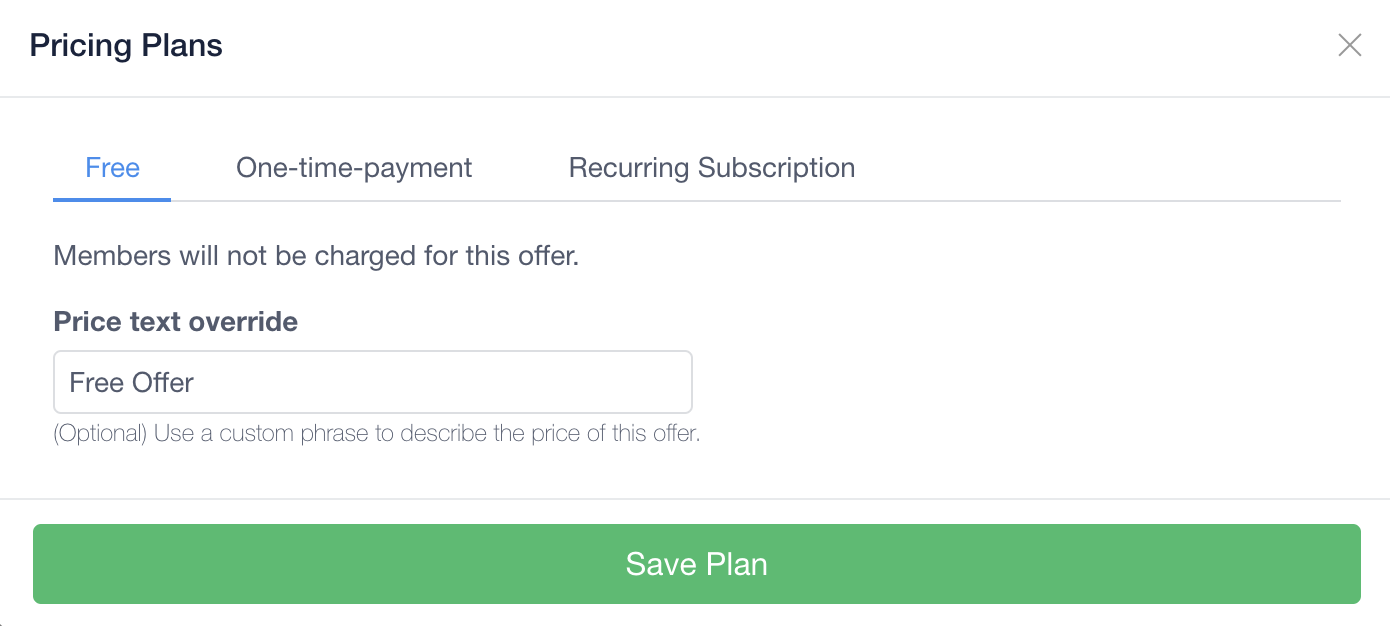
The price cannot be set to anything other than 0 until a payment portal is connected to your Gym Lead Machine account.
Edit the checkout page
The checkout page is what clients see when they open your Offer link. Everything below is edited from the checkout page itself.
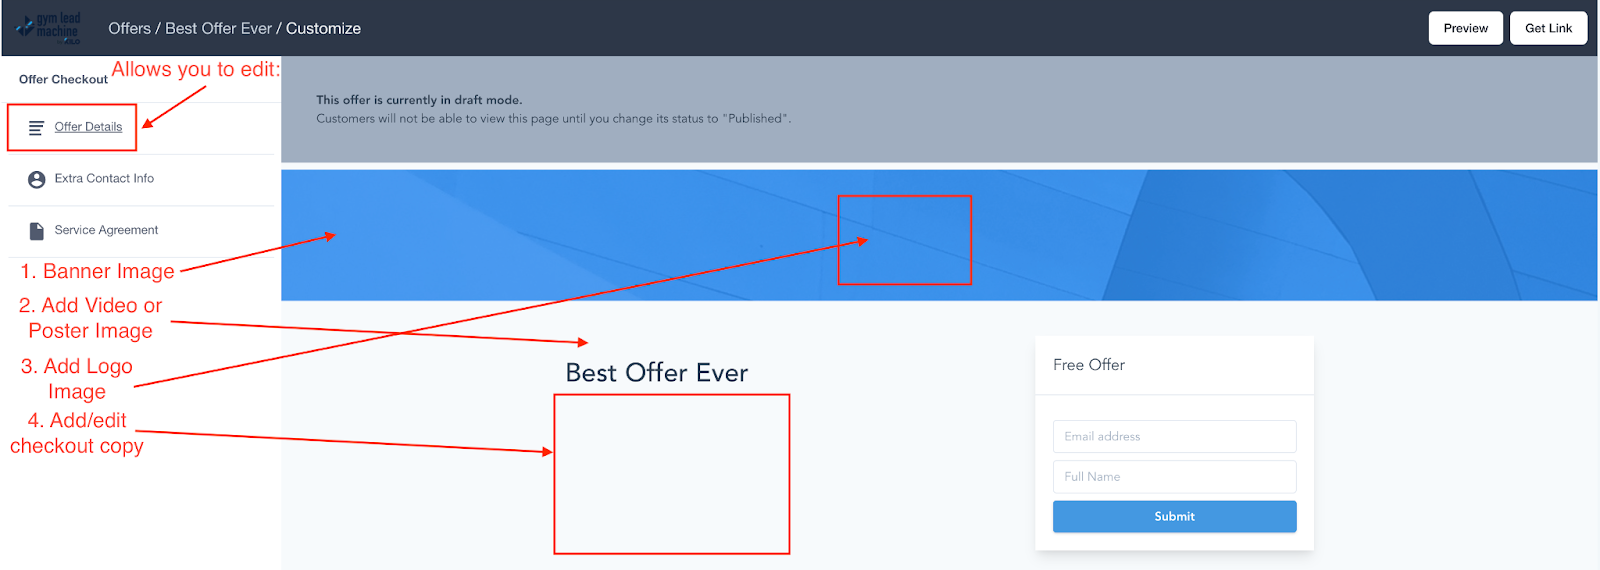
Open Offer Details to edit the Banner Image and its height.
Add a Video or a Poster Image. Either one appears above the Offer title, and if you add both, the video is what displays.
Edit the Logo Image, which appears in the middle of the banner.
Edit the Checkout Copy, which appears below the Offer title.
Open Extra Contact Info to add an address field, a phone number field, or both.
Open the Service Agreement section to choose whether the agreement is required, keep or customize the default text, and add your service agreement link.
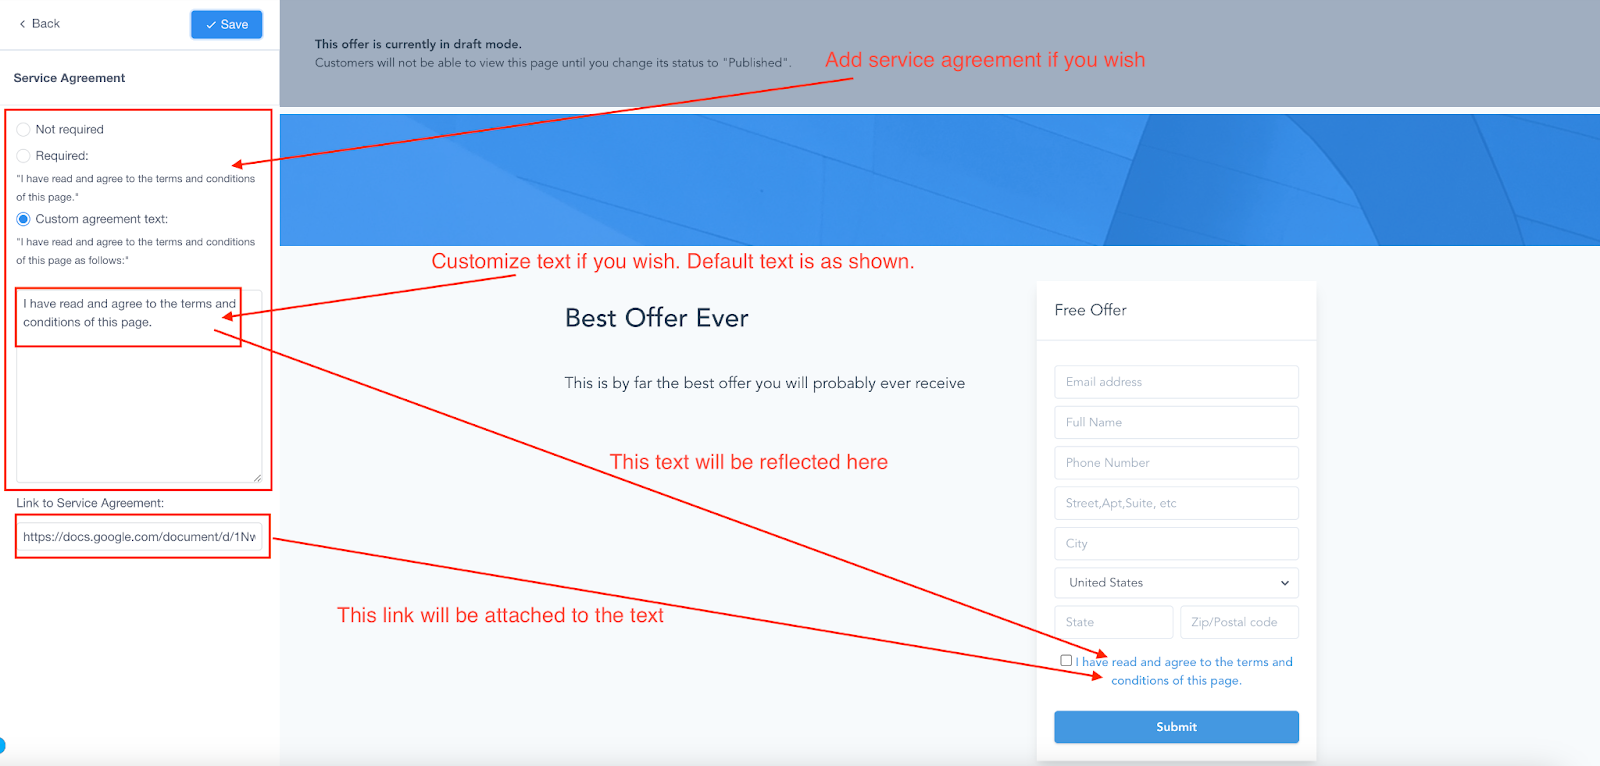
Use Preview regularly while you work so you can see how each change looks to a client before you finish.
Frequently asked questions
Do I need Stripe to create an Offer?
Only if you want to charge for the course. Free Offers can be created and published without any payment portal connected. To set a price above 0, connect a payment portal such as Stripe first.
Can one Offer include more than one course?
Yes. You select a main Product when you create the Offer, then add additional Products from the Offer detail page afterward. Clients who opt in get access to every Product in the Offer.
Can I change the price after I create the Offer?
Yes. Open the Offer and click Edit Price to switch between free, one-time payment, and recurring subscription, or to change the amount.
What payment types can an Offer use?
Free, a one-time payment, or a recurring subscription. You choose between them on the Edit Price page.
What happens after someone opts in to an Offer?
They get access to their Product library, and first-time users receive a Welcome Email with a username, a password, and a link back to the course. Returning clients use the login they already have.
Can I use both a video and an image on the checkout page?
You can add both, but only the video will display. The video and the poster image occupy the same spot above the Offer title, and the video takes priority.
Helpful tips
Connect your payment portal before you build a paid Offer, so you are not blocked at the price field
Leave the price at 0 while you build, then set it once the Offer is ready
Add your main Product at creation and attach the rest from the detail page
Preview the checkout page after every change rather than at the end
Add your service agreement link before publishing if the agreement is required
Keep checkout copy short, since it sits directly under the Offer title
If you have questions about Offers or checkout options in Gym Lead Machine, our Support team is happy to help. Reach us at hello@usekilo.com.