[Athlete App] Adding Payment Method to Kilo
Whether you’ve recently migrated to Kilo or are launching as a brand-new gym, it’s important to know how to guide athletes through adding their payment method in the Kilo Athlete App.
Athlete Account Activation Steps
-
Account Activation – After you invite an athlete to activate their Kilo account, they’ll receive an activation email from the system.
Set Password – Athletes accept the invite by clicking the activation link in the email and creating their Kilo password.
Log In – Once activated, athletes can log in:
- In a web browser at app.usekilo.com, or
- In the Kilo App, available on the Apple App Store or Google Play Store.
👀 Tip: See a visual walkthrough of the athlete activation process in this infographic.
Adding a Payment Method
Once logged in, athletes can add their payment information from the Account section of the Kilo Athlete App.
Credit Card Payments
To add a credit card:
- Enter the card number, expiration date, security code, and billing address (country and ZIP code).
- Click Save to complete setup.
Bank Account Payments
The preferred method for adding a bank account is to search for and select the athlete’s bank, then follow the Stripe connection wizard to link the account.
- Search and select the correct bank.
- Agree to continue to the Stripe wizard.
- Log in to the online banking portal when prompted.
- Approve your gym’s Kilo Gym Management account to withdraw payments.
- Follow the setup wizard to the end and click Save on the payment method page.
✅ Bank accounts added this way appear immediately in the athlete’s profile and do not require additional verification.
Important: We recommend athletes complete this process in Google Chrome at app.usekilo.com. Some users have reported timeouts when connecting a bank account through the mobile app. Our development team is actively addressing this issue.
Manual Bank Entry (Alternate Method)
If the athlete cannot find their bank or prefers to enter details manually:
- Choose Enter bank details manually.
- Enter the routing and account number, then click Submit in the Stripe pop-up.
- Click Save on the payment method page.
- Athlete should check their email account for an email, subject line: Verify your Bank account.
- Click Verify Account within the email.
- A Payment portal from Stripe will open for verification.
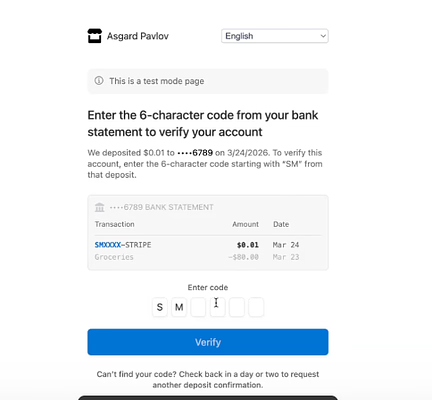
To complete verification:
- Check the bank account for a $0.01 deposit from Stripe.
- Find the statement descriptor code beginning with “SM.”
- Click the verification link in the Stripe email and enter the code.
- Links are valid for 10 days.
Once verified, the bank account will appear in the athlete’s Kilo profile.
👀 For a visual guide, check out the US bank verification infographic and the Canadian bank account infographic.